<?xml version="1.0" encoding="utf-8"?><feed xmlns="http://www.w3.org/2005/Atom" ><generator uri="https://jekyllrb.com/" version="3.10.0">Jekyll</generator><link href="https://githugs.lol/feed.xml" rel="self" type="application/atom+xml" /><link href="https://githugs.lol/" rel="alternate" type="text/html" /><updated>2026-08-27T05:56:41+00:00</updated><id>https://githugs.lol/feed.xml</id><title type="html">githugs(lol)</title><subtitle>Code, notes, and whatever else I&apos;m building right now.</subtitle><entry><title type="html">Building an API That Says No</title><link href="https://githugs.lol/2026/08/26/building-an-api-that-says-no/" rel="alternate" type="text/html" title="Building an API That Says No" /><published>2026-08-26T16:00:00+00:00</published><updated>2026-08-26T16:00:00+00:00</updated><id>https://githugs.lol/2026/08/26/building-an-api-that-says-no</id><content type="html" xml:base="https://githugs.lol/2026/08/26/building-an-api-that-says-no/"><![CDATA[<p>Most API tutorials teach the happy path where you send a request and get your data back. That is the smaller half of the job. The half that matters is what happens when a request is wrong, or bad, or just weird, because over a long enough period of time that is the most of the requests your server will ever see.</p>

<p>I built a small CRUD API this month using Express on top of MongoDB with a React front end talking to it. The data is a “Student Roster” with a list of students and their respective class (just one). Nothing too clever, but somewhere between “it works on my machine” and “it’s on the internet” an API becomes a door with your name on it. This post is about one small part of that door: the status code.</p>

<h2 id="why-you-might-care-about-this">why you might care about this</h2>

<p>APIs are everywhere. Phones, apps, smart devices, even the site you are reading this on! They are also where the industry keeps getting hit. Pow.</p>

<p>There’s a nonprofit called the Open Worldwide Application Security Project (OWASP). Their purpose is to make the knowledge of application security free and public. <a href="https://owasp.org/API-Security/">Their API Security Top 10</a> is a project where they give people the top ten vulnerabilities for APIs and how to fix them. Example, number one on their list is Broken Object Level Authorization, which they describe as APIs exposing endpoints that handle object identifiers. Basically the server checks if you’re logged in but it never checks if the thing you asked for is actually yours so changing a character in the request URL gives you someone else’s record. Wack.</p>

<p>Nearly everything on that list is an API being too agreeable. So the goal is building one that refuses correctly, even if it’s not super fancy.</p>

<h2 id="if-you-want-to-follow-along">if you want to follow along</h2>

<p>The “try it yourself” below works against your own API. If you don’t have one, this is a whole one. It has no database, it forgets everything when you close it, and it gets the refusals right (woohoo!) which is the important thing.</p>

<div class="language-bash highlighter-rouge"><div class="highlight"><pre class="highlight"><code><span class="nb">mkdir </span>api-demo <span class="o">&amp;&amp;</span> <span class="nb">cd </span>api-demo
npm init <span class="nt">-y</span>
npm <span class="nb">install </span>express
</code></pre></div></div>

<p>Create a file called <code class="language-plaintext highlighter-rouge">server.js</code> and put this in it:</p>

<div class="language-js highlighter-rouge"><div class="highlight"><pre class="highlight"><code><span class="kd">const</span> <span class="nx">express</span> <span class="o">=</span> <span class="nx">require</span><span class="p">(</span><span class="dl">"</span><span class="s2">express</span><span class="dl">"</span><span class="p">);</span>
<span class="kd">const</span> <span class="nx">app</span> <span class="o">=</span> <span class="nx">express</span><span class="p">();</span>
<span class="nx">app</span><span class="p">.</span><span class="nx">use</span><span class="p">(</span><span class="nx">express</span><span class="p">.</span><span class="nx">json</span><span class="p">());</span>

<span class="kd">const</span> <span class="nx">students</span> <span class="o">=</span> <span class="p">[];</span>
<span class="kd">let</span> <span class="nx">nextId</span> <span class="o">=</span> <span class="mi">1</span><span class="p">;</span>

<span class="nx">app</span><span class="p">.</span><span class="kd">get</span><span class="p">(</span><span class="dl">"</span><span class="s2">/students</span><span class="dl">"</span><span class="p">,</span> <span class="p">(</span><span class="nx">req</span><span class="p">,</span> <span class="nx">res</span><span class="p">)</span> <span class="o">=&gt;</span> <span class="nx">res</span><span class="p">.</span><span class="nx">json</span><span class="p">(</span><span class="nx">students</span><span class="p">));</span>

<span class="nx">app</span><span class="p">.</span><span class="kd">get</span><span class="p">(</span><span class="dl">"</span><span class="s2">/students/:id</span><span class="dl">"</span><span class="p">,</span> <span class="p">(</span><span class="nx">req</span><span class="p">,</span> <span class="nx">res</span><span class="p">)</span> <span class="o">=&gt;</span> <span class="p">{</span>
  <span class="k">if</span> <span class="p">(</span><span class="o">!</span><span class="sr">/^</span><span class="se">\d</span><span class="sr">+$/</span><span class="p">.</span><span class="nx">test</span><span class="p">(</span><span class="nx">req</span><span class="p">.</span><span class="nx">params</span><span class="p">.</span><span class="nx">id</span><span class="p">))</span> <span class="p">{</span>
    <span class="k">return</span> <span class="nx">res</span><span class="p">.</span><span class="nx">status</span><span class="p">(</span><span class="mi">400</span><span class="p">).</span><span class="nx">json</span><span class="p">({</span> <span class="na">message</span><span class="p">:</span> <span class="dl">"</span><span class="s2">Invalid student ID</span><span class="dl">"</span> <span class="p">});</span>
  <span class="p">}</span>
  <span class="kd">const</span> <span class="nx">student</span> <span class="o">=</span> <span class="nx">students</span><span class="p">.</span><span class="nx">find</span><span class="p">((</span><span class="nx">s</span><span class="p">)</span> <span class="o">=&gt;</span> <span class="nx">s</span><span class="p">.</span><span class="nx">id</span> <span class="o">===</span> <span class="nb">Number</span><span class="p">(</span><span class="nx">req</span><span class="p">.</span><span class="nx">params</span><span class="p">.</span><span class="nx">id</span><span class="p">));</span>
  <span class="k">if</span> <span class="p">(</span><span class="o">!</span><span class="nx">student</span><span class="p">)</span> <span class="p">{</span>
    <span class="k">return</span> <span class="nx">res</span><span class="p">.</span><span class="nx">status</span><span class="p">(</span><span class="mi">404</span><span class="p">).</span><span class="nx">json</span><span class="p">({</span> <span class="na">message</span><span class="p">:</span> <span class="dl">"</span><span class="s2">Student not found</span><span class="dl">"</span> <span class="p">});</span>
  <span class="p">}</span>
  <span class="nx">res</span><span class="p">.</span><span class="nx">json</span><span class="p">(</span><span class="nx">student</span><span class="p">);</span>
<span class="p">});</span>

<span class="nx">app</span><span class="p">.</span><span class="nx">post</span><span class="p">(</span><span class="dl">"</span><span class="s2">/students</span><span class="dl">"</span><span class="p">,</span> <span class="p">(</span><span class="nx">req</span><span class="p">,</span> <span class="nx">res</span><span class="p">)</span> <span class="o">=&gt;</span> <span class="p">{</span>
  <span class="kd">const</span> <span class="p">{</span> <span class="nx">name</span><span class="p">,</span> <span class="na">class</span><span class="p">:</span> <span class="nx">klass</span> <span class="p">}</span> <span class="o">=</span> <span class="nx">req</span><span class="p">.</span><span class="nx">body</span> <span class="o">||</span> <span class="p">{};</span>
  <span class="k">if</span> <span class="p">(</span><span class="o">!</span><span class="nx">name</span> <span class="o">||</span> <span class="o">!</span><span class="nx">klass</span><span class="p">)</span> <span class="p">{</span>
    <span class="k">return</span> <span class="nx">res</span><span class="p">.</span><span class="nx">status</span><span class="p">(</span><span class="mi">400</span><span class="p">).</span><span class="nx">json</span><span class="p">({</span> <span class="na">message</span><span class="p">:</span> <span class="dl">"</span><span class="s2">name and class are required</span><span class="dl">"</span> <span class="p">});</span>
  <span class="p">}</span>
  <span class="kd">const</span> <span class="nx">student</span> <span class="o">=</span> <span class="p">{</span> <span class="na">id</span><span class="p">:</span> <span class="nx">nextId</span><span class="o">++</span><span class="p">,</span> <span class="nx">name</span><span class="p">,</span> <span class="na">class</span><span class="p">:</span> <span class="nx">klass</span> <span class="p">};</span>
  <span class="nx">students</span><span class="p">.</span><span class="nx">push</span><span class="p">(</span><span class="nx">student</span><span class="p">);</span>
  <span class="nx">res</span><span class="p">.</span><span class="nx">status</span><span class="p">(</span><span class="mi">201</span><span class="p">).</span><span class="nx">json</span><span class="p">(</span><span class="nx">student</span><span class="p">);</span>
<span class="p">});</span>

<span class="nx">app</span><span class="p">.</span><span class="nx">listen</span><span class="p">(</span><span class="mi">8080</span><span class="p">,</span> <span class="p">()</span> <span class="o">=&gt;</span> <span class="nx">console</span><span class="p">.</span><span class="nx">log</span><span class="p">(</span><span class="dl">"</span><span class="s2">listening on http://localhost:8080</span><span class="dl">"</span><span class="p">));</span>
</code></pre></div></div>

<p>Then run <code class="language-plaintext highlighter-rouge">node server.js</code> and leave it going in its own terminal. You’ll need a second terminal for the next part.</p>

<p>If you get <code class="language-plaintext highlighter-rouge">EADDRINUSE</code>, something else on your machine already has port 8080. Change that last line to any free port and use the same one in the commands below. On a Mac, 5000 and 7000 are taken by AirPlay, so don’t reach for those.</p>

<div class="note">
  <p>Public sandbox APIs won’t work for this, because JSONPlaceholder fakes every write and reports success, so it can never show you a 400. An API that refuses nothing can’t teach you anything about refusals, amaright?</p>
</div>

<h2 id="status-codes-are-a-contract">status codes are a contract</h2>

<p>Status codes are specified in <a href="https://www.rfc-editor.org/rfc/rfc9110.html">RFC 9110</a> and they mean specific things. 201 means you created something. 400 means the client sent garbage. 404 means the request was fine but the thing is not here. 500 means you broke it on your end. <a href="https://developer.mozilla.org/en-US/docs/Web/HTTP/Reference/Status">MDN keeps a readable version</a> if the RFC is heavy going.</p>

<p>This matters because the code is the only part of your response some clients will ever read. A front end that gets a 200 with an error message buried in the body has no way to know anything went wrong.</p>

<p>The distinction that took me longest was that a bad ID and a valid ID that doesn’t match anything are two different failures. <code class="language-plaintext highlighter-rouge">banana</code> is not an ID at all, so that’s a bad request (400). An ID that’s shaped right but doesn’t match any student is a fine question with a negative answer (404). Your demo server already tells them apart, which is what the regex check and the <code class="language-plaintext highlighter-rouge">find</code> are doing in two separate steps.</p>

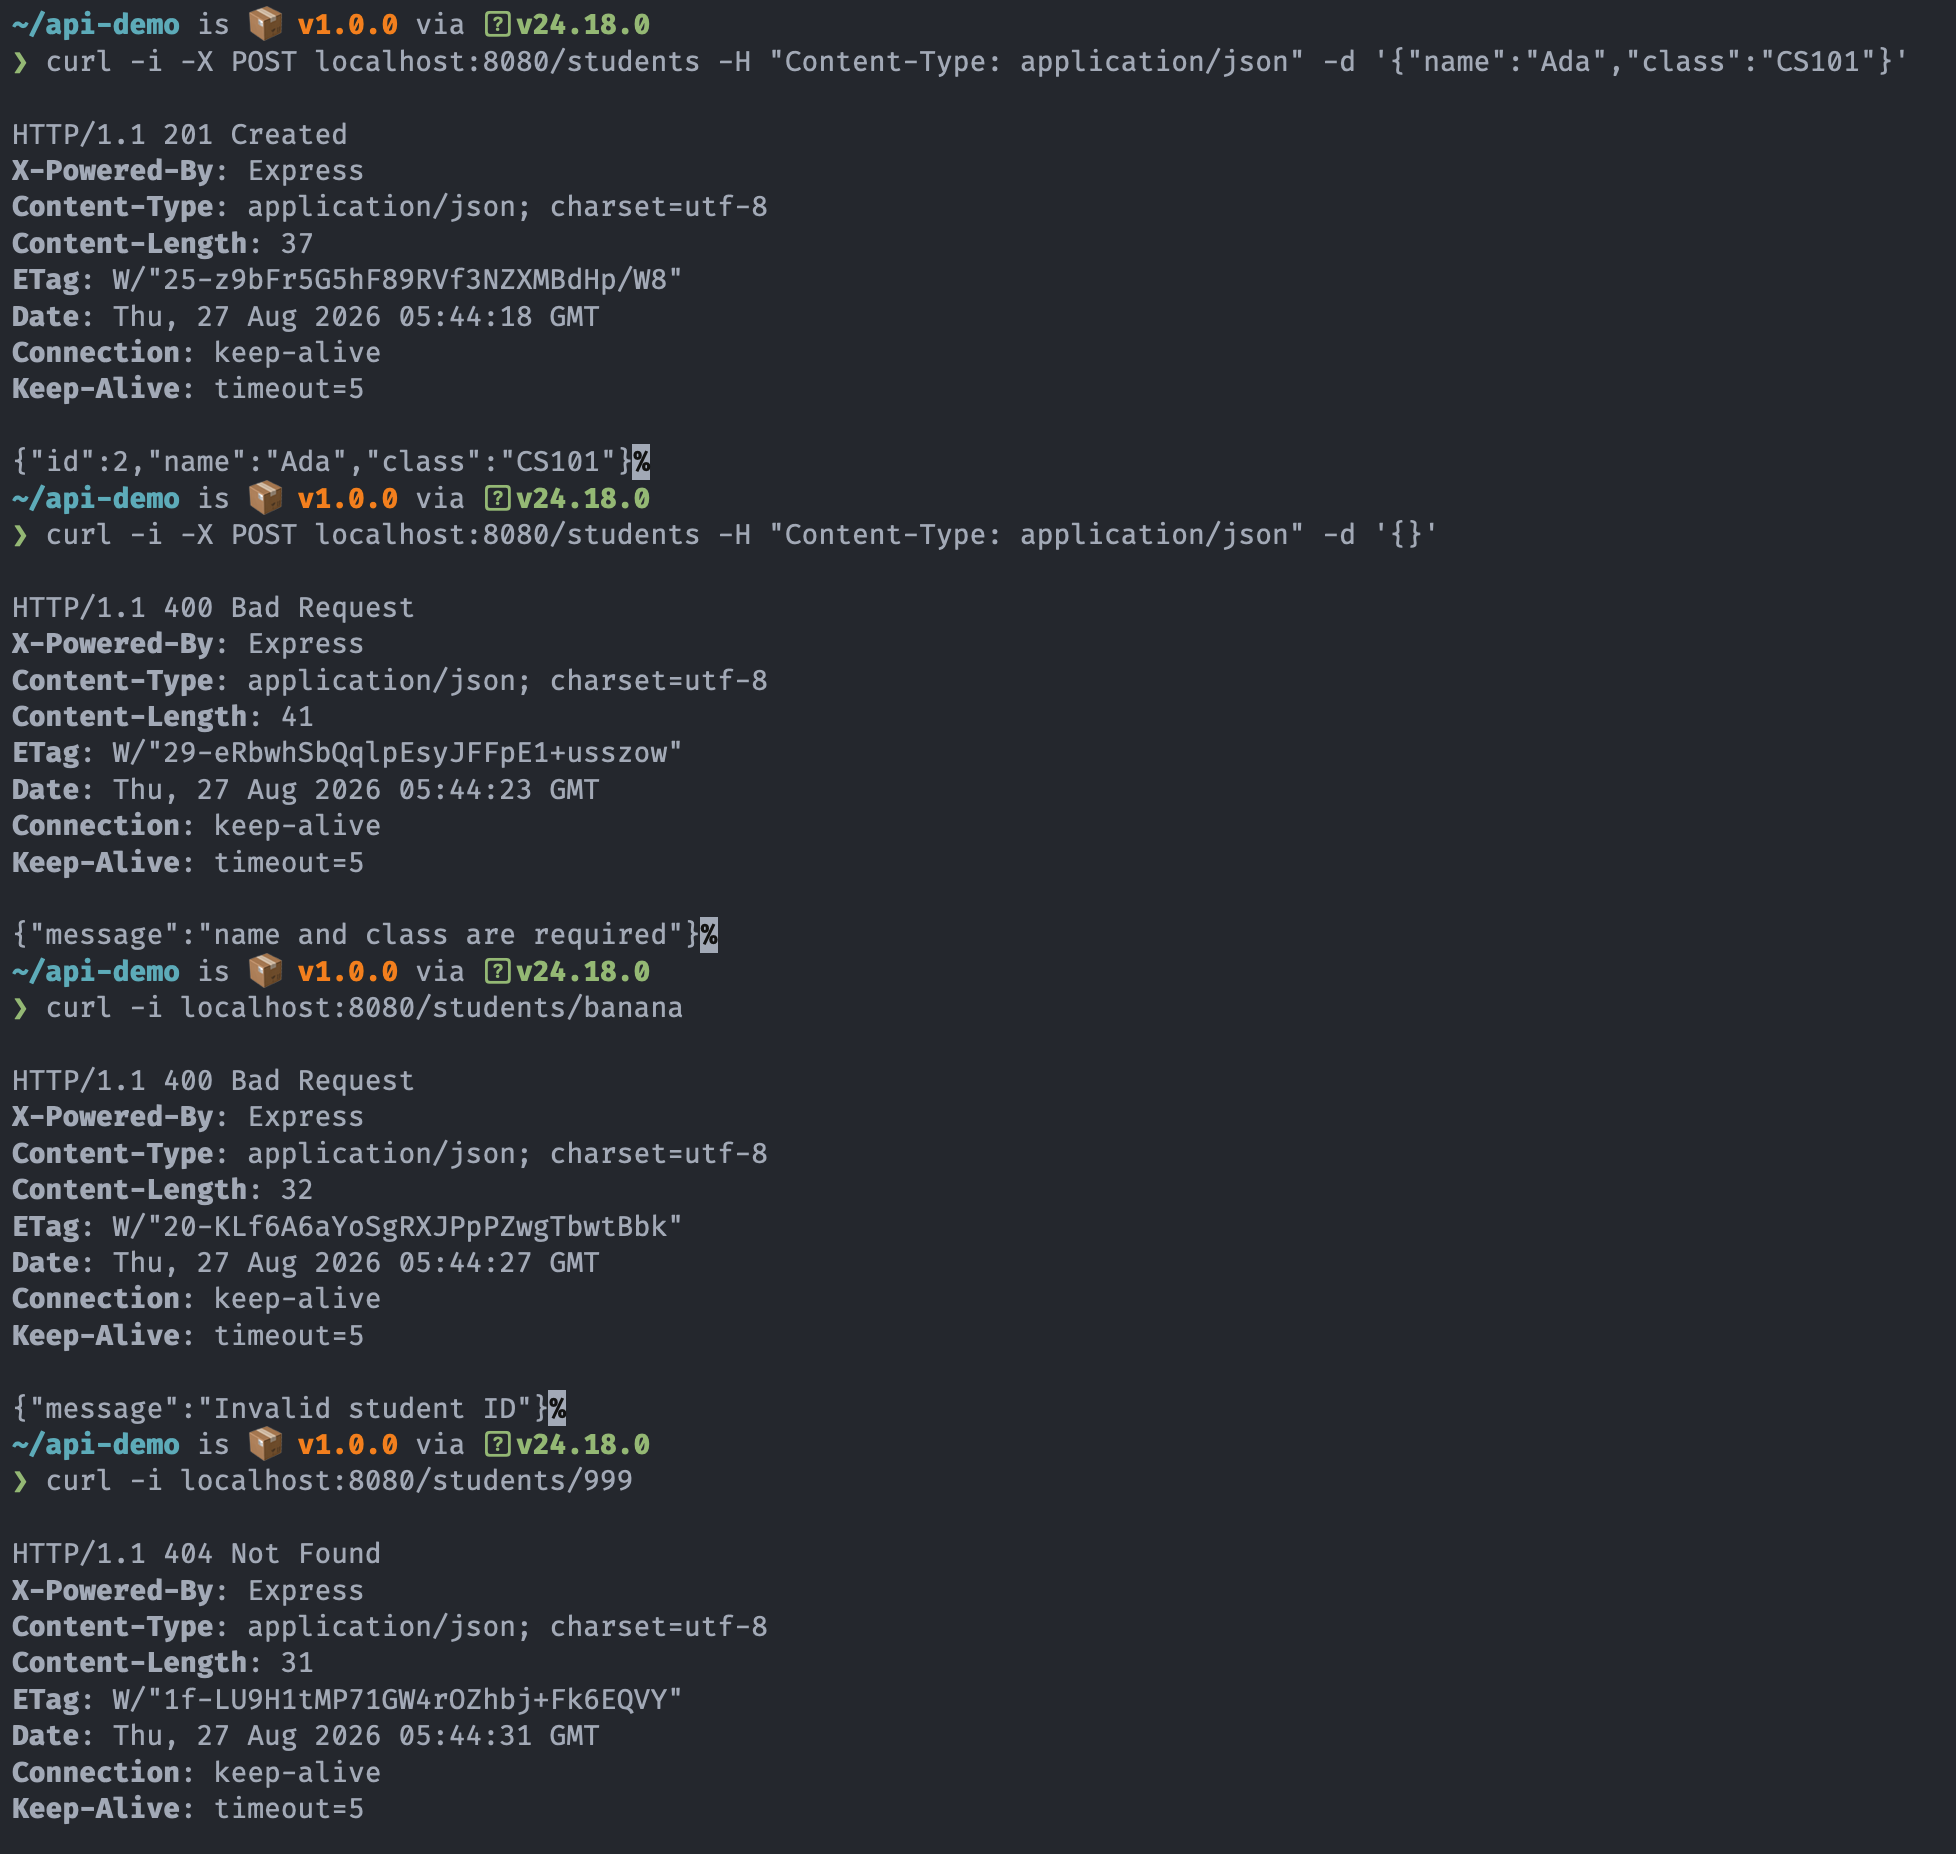
<p><strong>Try it yourself.</strong> In your second terminal, hit the API with <code class="language-plaintext highlighter-rouge">curl -i</code>, which prints the status line. One good request, one broken one, one bad ID, one that is structured properly but doesn’t exist:</p>

<div class="language-bash highlighter-rouge"><div class="highlight"><pre class="highlight"><code>curl <span class="nt">-i</span> <span class="nt">-X</span> POST localhost:8080/students <span class="nt">-H</span> <span class="s2">"Content-Type: application/json"</span> <span class="nt">-d</span> <span class="s1">'{"name":"Ada","class":"CS101"}'</span>
curl <span class="nt">-i</span> <span class="nt">-X</span> POST localhost:8080/students <span class="nt">-H</span> <span class="s2">"Content-Type: application/json"</span> <span class="nt">-d</span> <span class="s1">'{}'</span>
curl <span class="nt">-i</span> localhost:8080/students/banana
curl <span class="nt">-i</span> localhost:8080/students/999
</code></pre></div></div>

<p>You want 201, 400, 400, 404. Four requests and no 500, because 500 means your server took the blame for the client’s mistake. Each is a small refusal, and none of it needed a framework change or a rewrite.</p>

<p><img src="/assets/img/posts/api-status-codes.png" alt="terminal output of the four curl requests: 201 Created, 400 Bad Request, 400 Bad Request, and 404 Not Found" /></p>

<h2 id="sources">sources</h2>

<ul>
  <li><a href="https://owasp.org/API-Security/">OWASP API Security Top 10</a></li>
  <li><a href="https://www.rfc-editor.org/rfc/rfc9110.html">RFC 9110: HTTP Semantics</a></li>
  <li><a href="https://developer.mozilla.org/en-US/docs/Web/HTTP/Reference/Status">MDN, HTTP response status codes</a></li>
</ul>]]></content><author><name></name></author><category term="apis" /><category term="guides" /><summary type="html"><![CDATA[An API is a door you open on purpose. Build a tiny one in 10 minutes and watch it turn away the wrong requests!]]></summary></entry><entry><title type="html">Cyberdeck Build Guide</title><link href="https://githugs.lol/2026/08/18/cyberdeck-build-guide/" rel="alternate" type="text/html" title="Cyberdeck Build Guide" /><published>2026-08-18T16:00:00+00:00</published><updated>2026-08-18T16:00:00+00:00</updated><id>https://githugs.lol/2026/08/18/cyberdeck-build-guide</id><content type="html" xml:base="https://githugs.lol/2026/08/18/cyberdeck-build-guide/"><![CDATA[<p>Free guide (woohoo). Takes about an hour if nothing fights you.</p>

<div class="note">
  <p>You’ll need the hardware from the <a href="/2026/08/16/cyberdeck-parts/">parts list</a> and a laptop on the same wifi. This page is the hardware; the software that makes it a <em>deck</em> is the last step. No coding experience needed - you’ll be copying and pasting.</p>
</div>

<ol>
  <li><a href="#flash">Flash the OS</a></li>
  <li><a href="#first-boot">First Boot</a></li>
  <li><a href="#screen">The Screen</a></li>
  <li><a href="#trouble">Troubleshooting</a></li>
  <li><a href="#software">Pick a Soul</a></li>
</ol>

<h2 id="1-flash-the-os">1. Flash the OS</h2>

<p id="flash">Put the operating system on the memory card.</p>

<p>Grab <a href="https://www.raspberrypi.com/software/">Raspberry Pi Imager</a> and flash <strong>Raspberry Pi OS Lite (64-bit)</strong> to your microSD card. It hides under “Raspberry Pi OS (other)” in the OS list; everyone misses it the first time.</p>

<div class="note">
  <p>Heads up: flashing <strong>erases the card</strong>, so use a blank one or copy anything off it first.</p>
</div>

<p>Before you hit write, click the settings gear (the cog icon, sometimes labelled “Edit Settings”) and set:</p>

<ul>
  <li>a <strong>username</strong> - lowercase, no spaces (like <code class="language-plaintext highlighter-rouge">kire</code>)</li>
  <li>a <strong>hostname</strong> you’ll remember - mine is the deck’s name (like <code class="language-plaintext highlighter-rouge">writerdeck</code>). You’ll use this to connect in the next step.</li>
  <li>your <strong>wifi</strong> network and password</li>
  <li>tick the box to <strong>enable SSH</strong></li>
  <li>leave <strong>Enable Raspberry Pi Connect</strong> switched off - it’s a remote-access service you’d sign into, and you don’t need it when you’re reaching the Pi over SSH on your own wifi</li>
</ul>

<p>Setting all this now is why you never have to plug the Pi into a monitor or keyboard to get started.</p>

<h2 id="2-first-boot">2. First Boot</h2>

<p id="first-boot">Card in, power on, give it a few minutes.</p>

<p>The first boot does two or three minutes of invisible setup work. Then, from your laptop, open a terminal and connect using the <strong>username</strong> and <strong>hostname</strong> you set in step 1 (so if your hostname was <code class="language-plaintext highlighter-rouge">writerdeck</code>, that’s <code class="language-plaintext highlighter-rouge">writerdeck.local</code>):</p>

<div class="language-plaintext highlighter-rouge"><div class="highlight"><pre class="highlight"><code>ssh username@hostname.local
</code></pre></div></div>

<p>The first time, it’ll ask if you’re sure you want to connect - type <code class="language-plaintext highlighter-rouge">yes</code>. Then it asks for the password you set. If you see a terminal prompt afterwards, you’re in. You now own a computer you can talk to.</p>

<div class="note">
  <p><strong>“Connection refused”?</strong> Good news, weirdly. That means the Pi is on the network and just isn’t done setting up. Wait another minute and try again. If the name won’t resolve at all, find the Pi’s IP address in your router’s device list and use that instead: <code class="language-plaintext highlighter-rouge">ssh username@192.168.1.xxx</code>.</p>
</div>

<h2 id="3-the-screen">3. The Screen</h2>

<p id="screen">Two kinds of small screen, two paths.</p>

<p><strong>HDMI screens just work.</strong> Plug it in before you power on and the Pi finds it - nothing to install or configure. This is the path I recommend for every new build.</p>

<p><strong>SPI screens</strong> (the ones that mount on the GPIO pins, like the Hosyond 3.5”) are slower and need a driver installed once. Paste these lines one at a time:</p>

<div class="language-plaintext highlighter-rouge"><div class="highlight"><pre class="highlight"><code>git clone https://github.com/goodtft/LCD-show.git
cd LCD-show
chmod +x LCD35-show
sudo ./LCD35-show
</code></pre></div></div>

<p>The Pi reboots and the little screen comes alive. Under the hood a helper called <code class="language-plaintext highlighter-rouge">fbcp</code> mirrors the main framebuffer (<code class="language-plaintext highlighter-rouge">fb0</code>) onto the SPI panel. You don’t need to touch it, but knowing it exists saves you a confused hour later.</p>

<div class="note">
  <p>SPI quirks, so you don’t debug them for nothing: video playback needs <code class="language-plaintext highlighter-rouge">mplayer -vo fbdev2</code> (<code class="language-plaintext highlighter-rouge">mpv</code> can’t render to the framebuffer, hard limit, not your config), and a faint blue tint is a known <code class="language-plaintext highlighter-rouge">fbcp</code> thing. Cosmetic, harmless, weirdly grows on you. Fast-redraw stuff like video is where SPI suffers; for text it’s completely fine.</p>
</div>

<h2 id="4-troubleshooting">4. Troubleshooting</h2>

<p id="trouble"><img class="sticker sticker--right" src="/assets/img/stickers/duck.png" alt="a rubber duck" loading="lazy" width="252" height="300" style="--tilt:10deg;--w:5.5rem;" /></p>

<p>The stuff no tutorial warned me about.</p>

<ul>
  <li><strong>Scary SSH warning after reflashing.</strong> “REMOTE HOST IDENTIFICATION HAS CHANGED” in all-caps is your laptop remembering the old card’s identity, not an attack. Run <code class="language-plaintext highlighter-rouge">ssh-keygen -R yourdeck.local</code>, reconnect, accept the new fingerprint. Only worry if you see this when you <em>haven’t</em> reflashed.</li>
  <li><strong>404 Not Found during an install.</strong> The package mirror moved things mid-sync. Run <code class="language-plaintext highlighter-rouge">sudo apt update</code> and re-run whatever failed. Fixes it basically every time.</li>
  <li><strong>YouTube tools broken.</strong> Install <code class="language-plaintext highlighter-rouge">yt-dlp</code> through pip, not apt. The apt version is ancient and YouTube breaks it monthly.</li>
  <li><strong>Old tutorials disagree with what you see.</strong> Pi OS moves fast: menus get reorganized, config files move. Trust the error message and the current docs over a 2022 blog post. This guide gets re-tested every time I build a new deck.</li>
</ul>

<h2 id="5-pick-a-soul">5. Pick a Soul</h2>

<p id="software">The deck is the hardware, but the soul lives on the SD card. Everything above is the same for every deck here; the software you install last is what decides what it becomes.</p>

<p><strong>You’re not done yet - this is the fun part.</strong> Pick one below and follow its instructions; that’s where your deck actually comes to life.</p>

<div class="note">
  <p>Each one is its own repo with a step-by-step readme. Read the install script before you run it - that’s the whole point of it not being a mystery binary.</p>
</div>

<ul>
  <li><a href="/scripts/writerdeck/">writerdeck</a> - focused writing app, no cloud</li>
  <li><strong>focusdeck</strong> - coming soon</li>
  <li><strong>stellardeck</strong> - coming soon</li>
</ul>

<p>Before the software goes on, set up the rest of the hardware: to start, plug in a normal USB keyboard (Bluetooth pairing comes later, on the deck’s own page). <a href="https://docs.pisugar.com/docs/product-wiki/battery/pisugar3/pisugar-3-series">Add the PiSugar battery</a> to cut the cord, swap in your own colors, put it in a cool case. It’s your deck now. Share your build with me if you’d like!</p>]]></content><author><name></name></author><category term="cyberdecks" /><category term="guides" /><summary type="html"><![CDATA[The base build every cyberdeck here starts from. What to buy, how to flash it, and common troubleshooting steps.]]></summary></entry><entry><title type="html">Where to Find Cyberdeck Parts</title><link href="https://githugs.lol/2026/08/16/cyberdeck-parts/" rel="alternate" type="text/html" title="Where to Find Cyberdeck Parts" /><published>2026-08-16T16:00:00+00:00</published><updated>2026-08-16T16:00:00+00:00</updated><id>https://githugs.lol/2026/08/16/cyberdeck-parts</id><content type="html" xml:base="https://githugs.lol/2026/08/16/cyberdeck-parts/"><![CDATA[<p>Everything that goes into a deck and where to buy it, globally.</p>

<div class="note">
  <p>Buy from a shop in your own region if you can. The links below go to the maker or a US shop so you can see the exact part; the <a href="#where-to-buy">shops further down</a> sell the same things wherever you live. Items marked * are what I used.</p>
</div>

<h2 id="parts-list">Parts List</h2>

<h3 id="computer---from-17">Computer - from ~$17</h3>

<p>A Raspberry Pi, basically a credit-card-sized computer.</p>

<ul>
  <li><a href="https://www.raspberrypi.com/products/raspberry-pi-3-model-b-plus/">Raspberry Pi 3 B+</a>*</li>
  <li><a href="https://www.raspberrypi.com/products/raspberry-pi-zero-2-w/">Raspberry Pi Zero 2 W</a></li>
  <li><a href="https://www.raspberrypi.com/products/raspberry-pi-4-model-b/">Raspberry Pi 4</a></li>
  <li><a href="http://www.orangepi.org/html/hardWare/computerAndMicrocontrollers/details/Orange-Pi-Zero-2W.html">Orange Pi Zero 2W</a> - pair with an HDMI screen</li>
</ul>

<h3 id="screen---from-15">Screen - from ~$15</h3>

<p>A small display that sits right on top of the Pi.</p>

<ul>
  <li><a href="https://www.amazon.com/Hosyond-480x320-Screen-Display-Raspberry/dp/B0BJDTL9J3">Hosyond 3.5” SPI Touchscreen</a>* - Raspberry Pi only</li>
  <li><a href="https://www.waveshare.com/3.5inch-hdmi-lcd-e.htm">Waveshare 3.5” HDMI Display</a></li>
  <li><a href="https://www.waveshare.com/5inch-hdmi-lcd-h.htm">Waveshare 5” HDMI Display</a></li>
</ul>

<h3 id="memory-card---from-9">Memory Card - from ~$9</h3>

<p>A microSD card is the deck’s storage, like a tiny hard drive.</p>

<ul>
  <li><a href="https://www.amazon.com/SanDisk-Ultra-microSDHC-Memory-Adapter/dp/B08GY9NYRM">SanDisk Ultra 32GB</a>*</li>
  <li><a href="https://www.amazon.com/SanDisk-Ultra-microSDXC-Memory-Adapter/dp/B0B7NXBM6P">SanDisk Ultra 64GB</a></li>
  <li><a href="https://www.amazon.com/SanDisk-2-Pack-microSDXC-Memory-Adapter/dp/B0B7NVMBPL">SanDisk Ultra 64GB (2-Pack)</a> - one card per deck soul</li>
</ul>

<h3 id="keyboard---from-0">Keyboard - from $0</h3>

<p>Important for setup, optional after that.</p>

<ul>
  <li><a href="https://www.amazon.com/dp/B0FVFM1NNZ">Miritz Mini Bluetooth Keyboard + Touchpad</a>*</li>
  <li><a href="https://www.amazon.com/Rii-Keyboard-Control-Touchpad-Android/dp/B00JO80LUI">Rii i8 Mini Wireless Keyboard + Touchpad</a></li>
  <li><a href="https://www.amazon.com/Foldable-Bluetooth-Keyboard-Touchpad-Rechargeable/dp/B07XMM1XJV">Samsers Foldable Bluetooth Keyboard + Touchpad</a></li>
  <li>No keyboard at all - control it from your laptop instead.</li>
</ul>

<h3 id="power-source---from-10">Power Source - from ~$10</h3>

<p>Wall power to start with, a battery when you want to cut the cord.</p>

<ul>
  <li><a href="https://www.canakit.com/raspberry-pi-adapter-power-supply-2-5a.html">CanaKit 2.5A Micro-USB Charger</a>*</li>
  <li><a href="https://www.canakit.com/raspberry-pi-4-power-supply.html">CanaKit 3.5A USB-C Charger</a></li>
  <li><a href="https://www.pisugar.com/products/pisugar-3-plus-raspberry-pi-ups">PiSugar 3 Plus Battery</a>*</li>
</ul>

<h2 id="where-to-buy">Where to Buy</h2>

<p id="where-to-buy">Search the same part names at whichever of these ships to you. Local first, always.</p>

<h3 id="united-states">United States</h3>

<ul>
  <li><a href="https://www.adafruit.com">Adafruit</a></li>
  <li><a href="https://www.sparkfun.com">SparkFun</a></li>
  <li><a href="https://www.pishop.us">PiShop.us</a></li>
  <li><a href="https://www.microcenter.com">Micro Center</a> - in-store pickup nearby</li>
  <li><a href="https://www.digikey.com">DigiKey</a> - components &amp; connectors</li>
  <li><a href="https://www.mouser.com">Mouser</a> - components &amp; connectors</li>
</ul>

<h3 id="canada">Canada</h3>

<ul>
  <li><a href="https://www.pishop.ca">PiShop.ca</a></li>
  <li><a href="https://www.buyapi.ca">BuyaPi.ca</a></li>
</ul>

<h3 id="united-kingdom">United Kingdom</h3>

<ul>
  <li><a href="https://shop.pimoroni.com">Pimoroni</a></li>
  <li><a href="https://thepihut.com">The Pi Hut</a></li>
</ul>

<h3 id="europe">Europe</h3>

<ul>
  <li><a href="https://www.berrybase.de">BerryBase</a> - Germany</li>
  <li><a href="https://www.kubii.com">Kubii</a> - France</li>
  <li><a href="https://www.melopero.com">Melopero</a> - Italy</li>
</ul>

<h3 id="australia--new-zealand">Australia &amp; New Zealand</h3>

<ul>
  <li><a href="https://core-electronics.com.au">Core Electronics</a></li>
  <li><a href="https://www.littlebird.com.au">Little Bird</a></li>
</ul>

<h3 id="ships-almost-anywhere">Ships Almost Anywhere</h3>

<ul>
  <li><a href="https://www.waveshare.com">Waveshare</a></li>
  <li><a href="https://www.seeedstudio.com">Seeed Studio</a></li>
  <li><a href="https://www.tindie.com">Tindie</a></li>
  <li><a href="https://www.aliexpress.com">AliExpress</a> - cheapest, check reviews</li>
</ul>

<h2 id="next">Next</h2>

<p>The <a href="/2026/08/18/cyberdeck-build-guide/">build guide</a> puts these parts together step by step. Free forever.</p>]]></content><author><name></name></author><category term="cyberdecks" /><category term="parts" /><summary type="html"><![CDATA[Everything that goes into a cyberdeck build, what it costs, and the shop that ships to you.]]></summary></entry><entry><title type="html">What Is a Cyberdeck</title><link href="https://githugs.lol/2026/08/14/what-is-a-cyberdeck/" rel="alternate" type="text/html" title="What Is a Cyberdeck" /><published>2026-08-14T16:00:00+00:00</published><updated>2026-08-14T16:00:00+00:00</updated><id>https://githugs.lol/2026/08/14/what-is-a-cyberdeck</id><content type="html" xml:base="https://githugs.lol/2026/08/14/what-is-a-cyberdeck/"><![CDATA[<p>A cyberdeck is a small computer you build yourself, so you know exactly what is inside it and exactly what it does. The word comes straight out of cyberpunk fiction. In <a href="https://en.wikipedia.org/wiki/Neuromancer">Neuromancer</a>, console cowboys jack into the matrix on decks they trust with their lives, hardware they know down to the last chip. That is the whole appeal.</p>

<p>Modern devices want your attention all the time. A deck flips that around. You give it one job, like writing or music or reading, and it does that job with a glowing terminal and nothing else. No noise or doomscrolling or black box. You built it so it works for you.</p>

<h2 id="types-of-cyberdecks">Types of Cyberdecks</h2>

<p><img class="sticker sticker--right" src="/assets/img/stickers/dune.png" alt="the cover of Dune by Frank Herbert" loading="lazy" width="204" height="300" style="--tilt:-7deg;--w:6rem;" /></p>

<p>There is no official spec. If you built it and it computes, it counts. Most decks fall into a few loadouts:</p>

<ul>
  <li><strong>Pi builds.</strong> A Raspberry Pi, a small screen, a keyboard you like. Cheap and endlessly hackable. This is where I live and where every guide on this site starts.</li>
  <li><strong>Reclaimed computers.</strong> Dead laptops, thrifted ThinkPads, e-waste brought back to life with Linux. The most cyberpunk option: <a href="https://en.wikipedia.org/wiki/Burning_Chrome">the street finds its own uses for things.</a></li>
  <li><strong>Handhelds &amp; e-ink.</strong> Pocket decks, one-purpose readers, tamagotchi-sized machines. Small batteries, small screens, zero distractions by design.</li>
  <li><strong>Luggables.</strong> Pelican cases, folding rigs, decks with handles, all built to be carried to wherever the work is and opened like a spellbook.</li>
</ul>

<div class="note">
  <h2 id="the-trick">The Trick</h2>

  <p>The deck is the hardware, but the soul lives on the SD card. Flash a different card, boot the same machine, and it’s a different device entirely. A writing machine. A music terminal. A star atlas. Keep a stack of cards and one deck becomes many.</p>

  <p>So there’s one hardware build for all of it - <a href="/2026/08/18/cyberdeck-build-guide/">the build guide</a> - and then the software you put on top decides what the deck is.</p>

</div>

<h2 id="my-decks">My Decks</h2>

<p>Each deck flavor is its own code repository with documentation and an install script.</p>

<ul>
  <li><a href="/scripts/writerdeck/">writerdeck</a> - focused writing app, no cloud</li>
  <li><strong>focusdeck</strong> - coming soon</li>
  <li><strong>stellardeck</strong> - coming soon</li>
</ul>

<p>If this helped, consider <a href="https://ko-fi.com/githugs">buying me a coffee</a>. It keeps me going &lt;3</p>]]></content><author><name></name></author><category term="cyberdecks" /><category term="sci-fi" /><category term="books" /><summary type="html"><![CDATA[Tiny handmade computers that do one thing well. Here's what they are, the kinds people build, and how to build your own.]]></summary></entry></feed>